
Overview of Entra for LSEG Workspace
With LSEG moving to a more modern identity management with Microsoft Entra, your users can now sign in using their existing corporate credentials, without the need for separate usernames, passwords, and authentication methods.
In addition to enabling sign-in with Microsoft Entra, you can automate user provisioning based on changes in your organization’s Microsoft Entra ID.
Learn how Microsoft Entra ID integration delivers a simpler Workspace sign-in experience and less admin overhead for your organisation.
About Automated User Provisioning with SCIM
SCIM, or System for Cross-domain Identity Management, is an open standard that automates user provisioning in LSEG Workspace.
With SCIM, users can be automatically provisioned to LSEG Workspace when they're added to your provisioning scope and deprovisioned when they're removed.
Benefits of Automated User Provisioning
Automatic User Creation
Create user accounts automatically in LSEG Workspace as new users are added to your Microsoft Entra environment.
Reduced Administrative Effort
Reduce the manual work involved in creating and managing individual user accounts.
Consistent Identity Management
Help reduce identity duplication and drift between your organisation and LSEG systems.
Joiner and Leaver Management
Supports Joiner-Leaver compliance as employees join or leave your organisation.
Getting Started with User Provisioning
Enable Workspace Sign-In Access
Before setting up provisioning, you will need to grant tenant-wide consent for two applications: LSEG Workspace and LSEG Identity.
Click each link below to open the consent screen.
1. LSEG Workspace
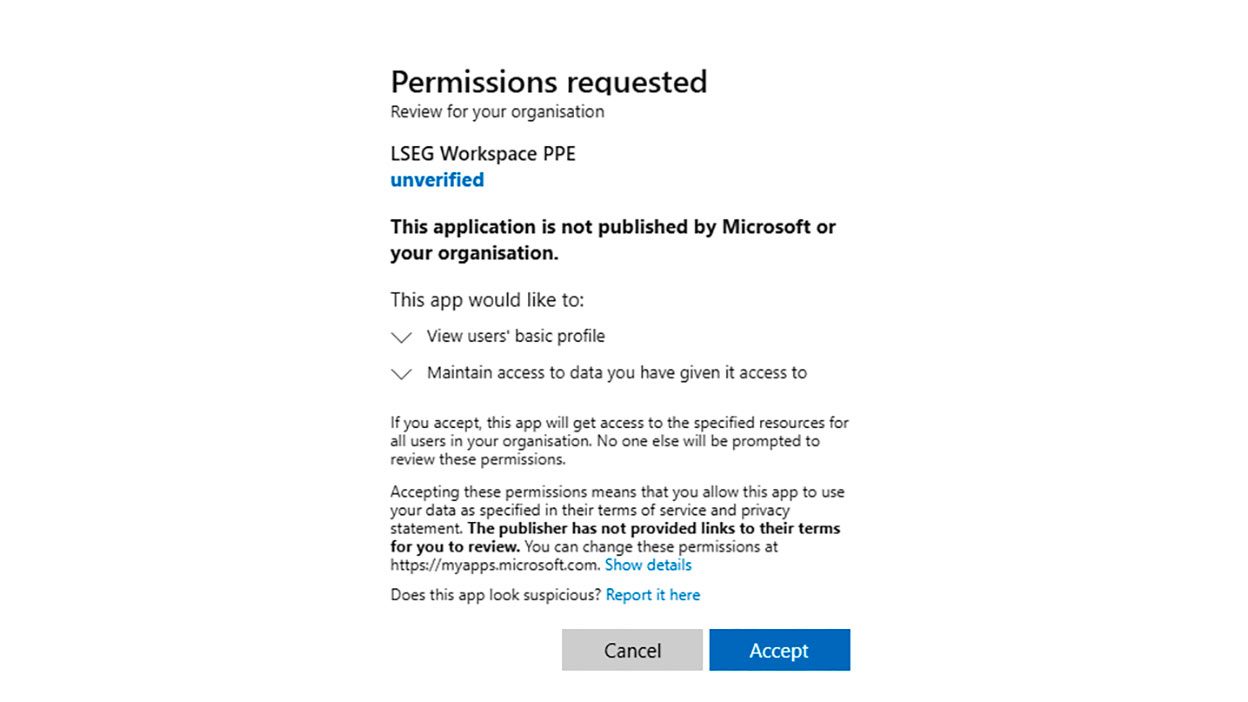
Click Accept to grant consent.
2. LSEG Identity
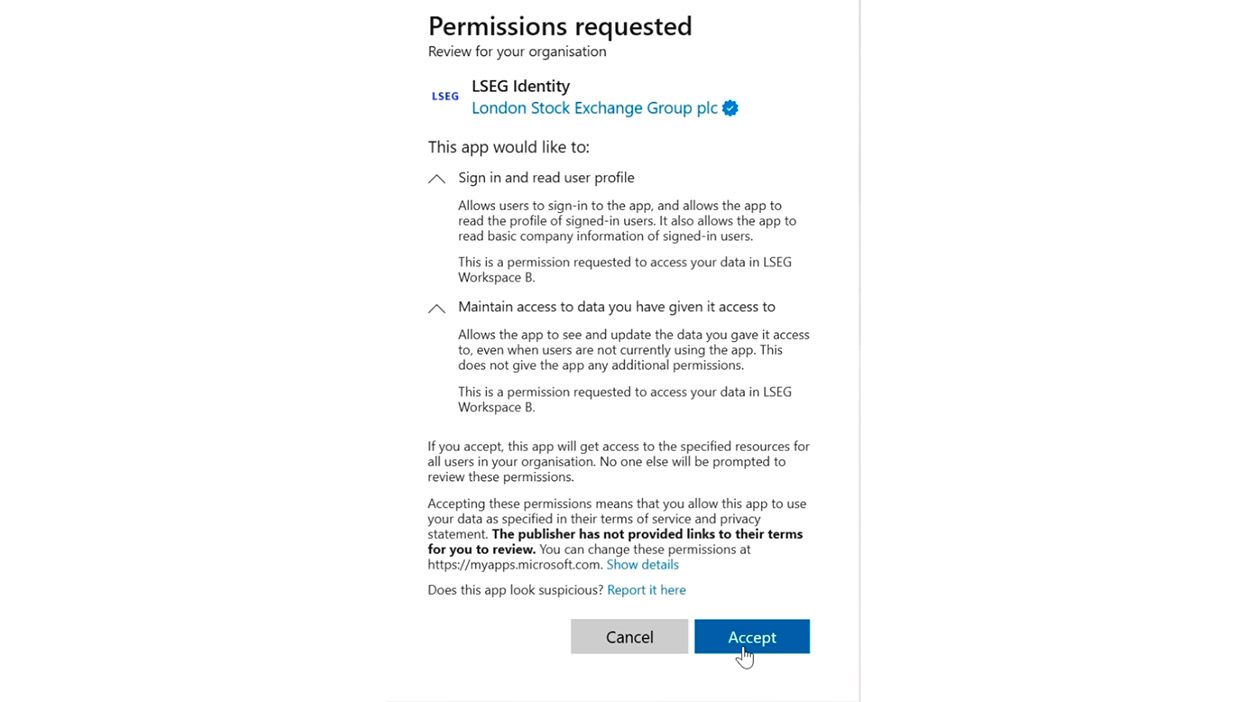
Click Accept to grant consent.
Set Up Automated Provisioning
1. In Microsoft Entra, go to the Overview page and copy your Tenant ID.
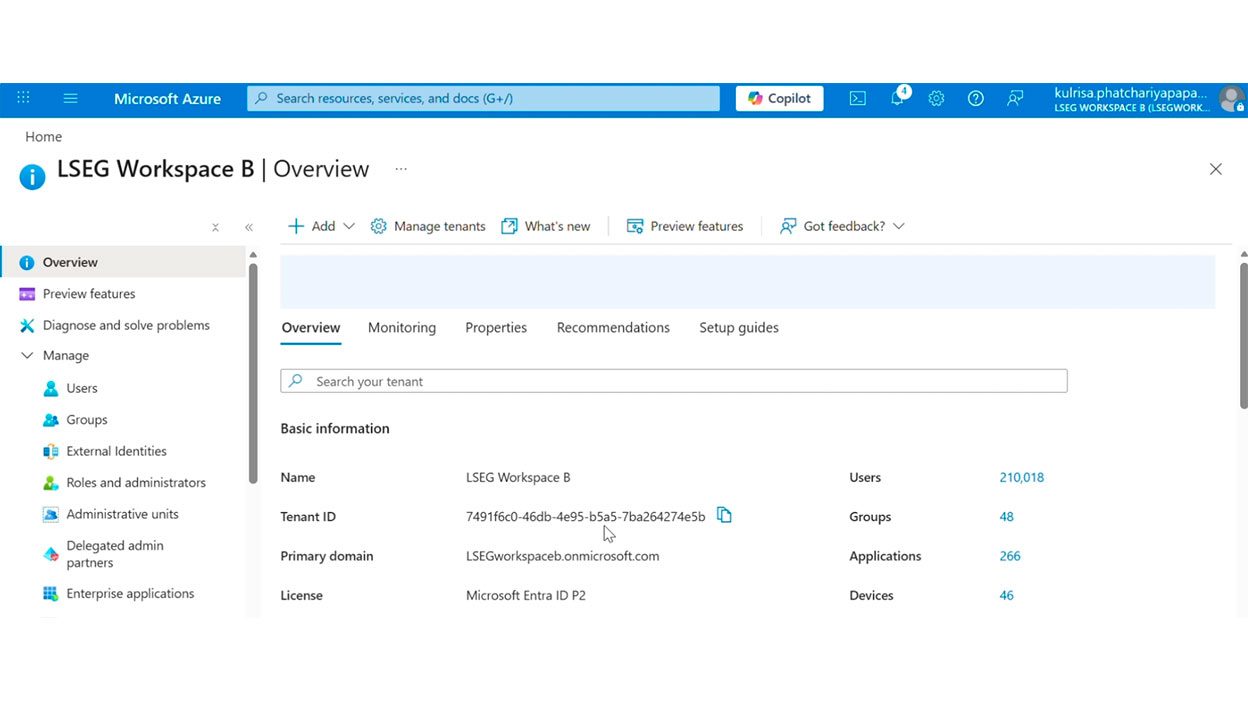
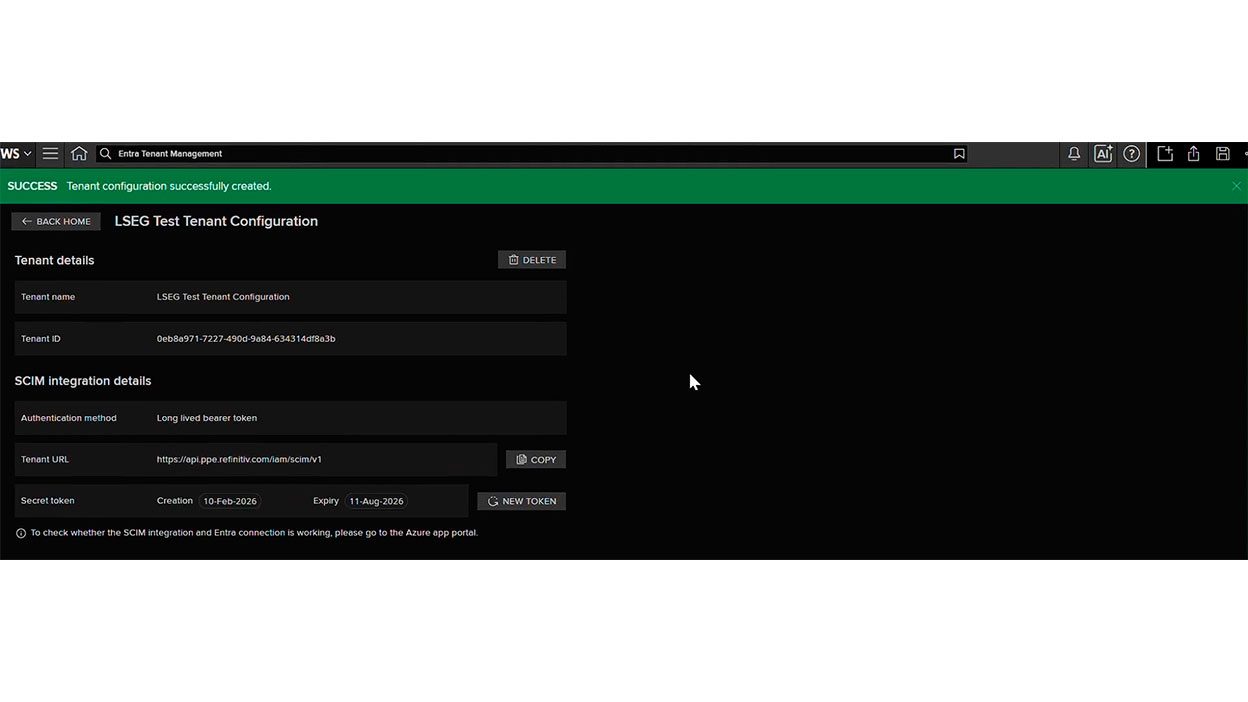
2. In LSEG Workspace Desktop, enter your tenant details and paste the Tenant ID. Click Create. LSEG Workspace automatically completes the required SCIM setup.
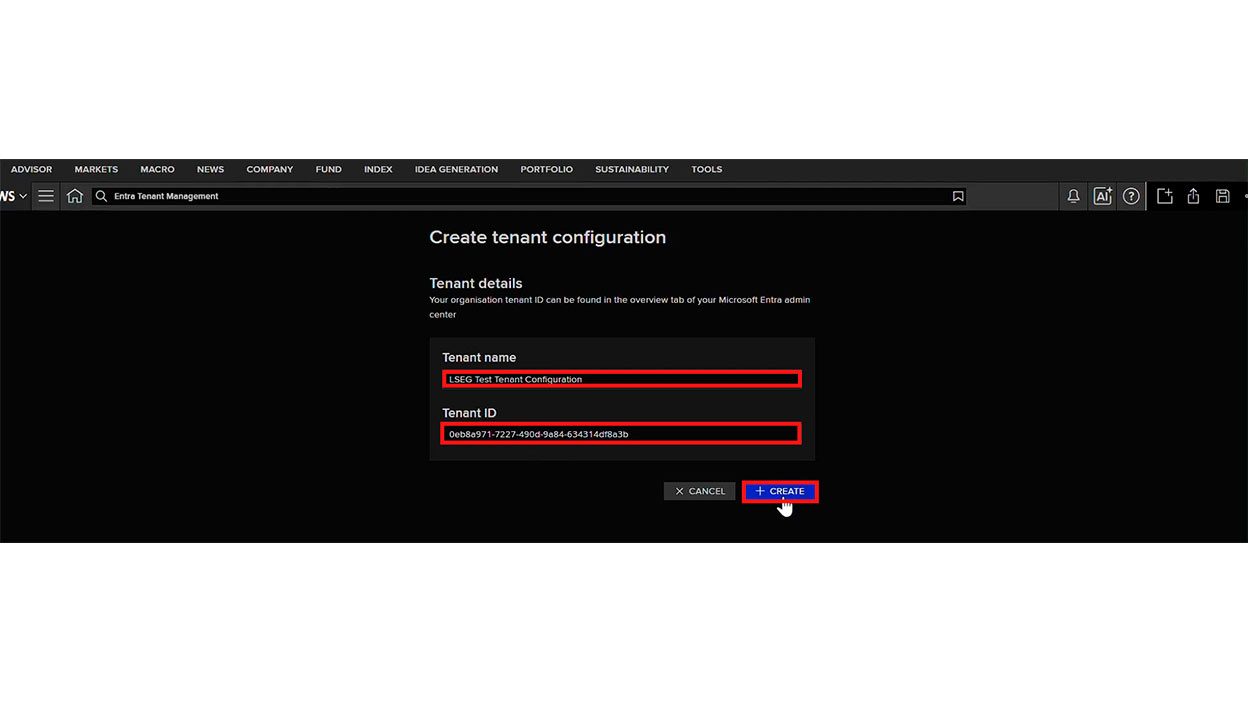
3. Copy your SCIM integration details, including the token.
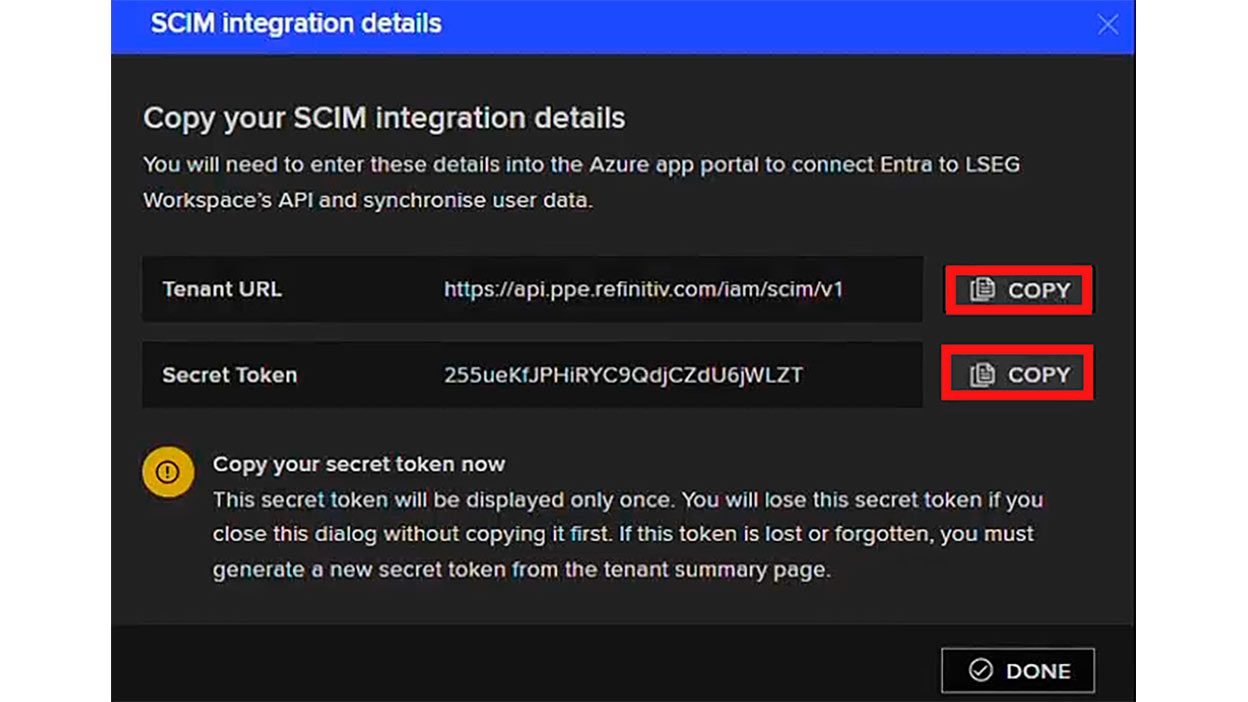
> **Important:** Your token is shown only once and is valid for six months. Copy it immediately. If it's lost, you'll need to generate a new one.
4. In Microsoft Entra, go to Enterprise Applications and locate the LSEG Identity application.
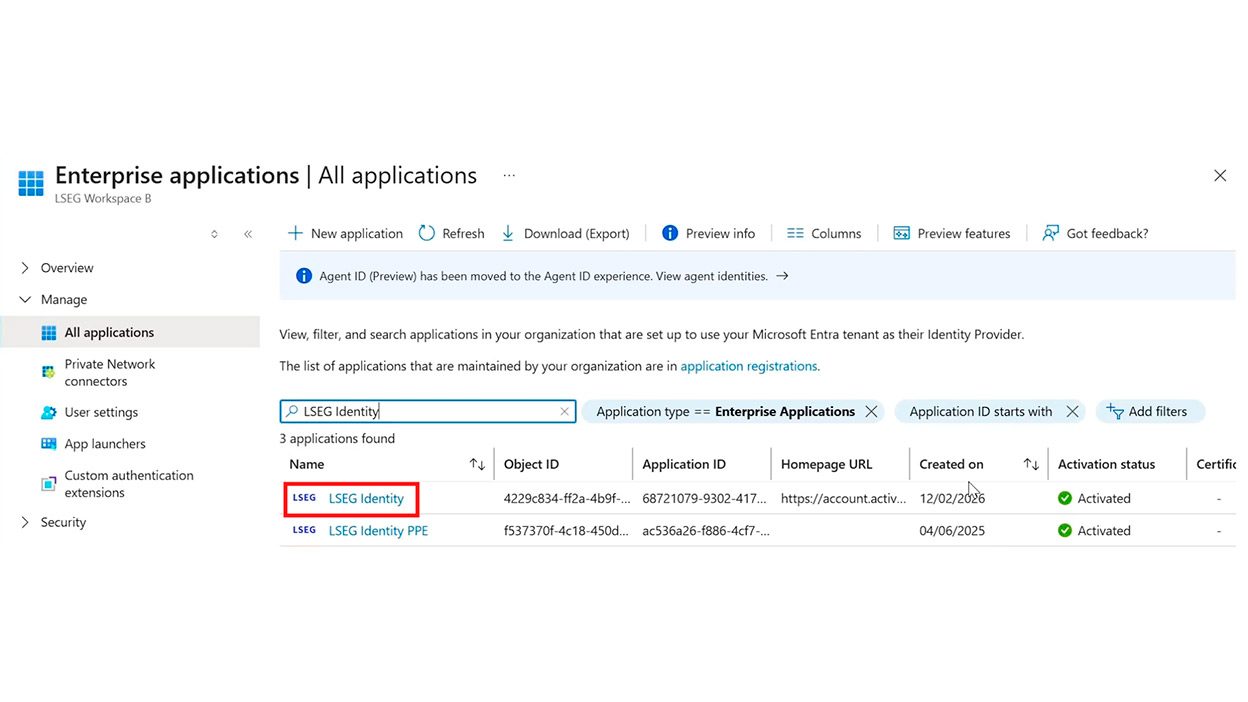
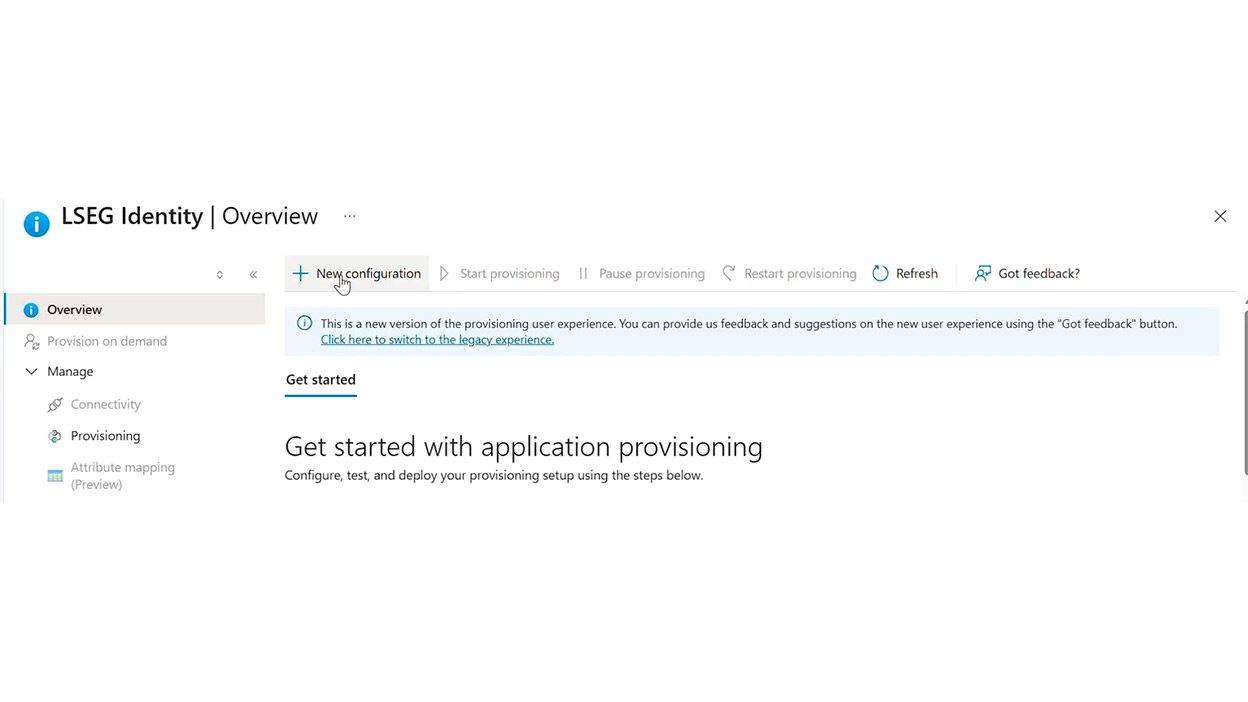
5. On the Provisioning tab, select New Configuration to start provisioning.
6. Paste in the Tenant URL and Secret Token you copied from LSEG Workspace, then select Test Connection.
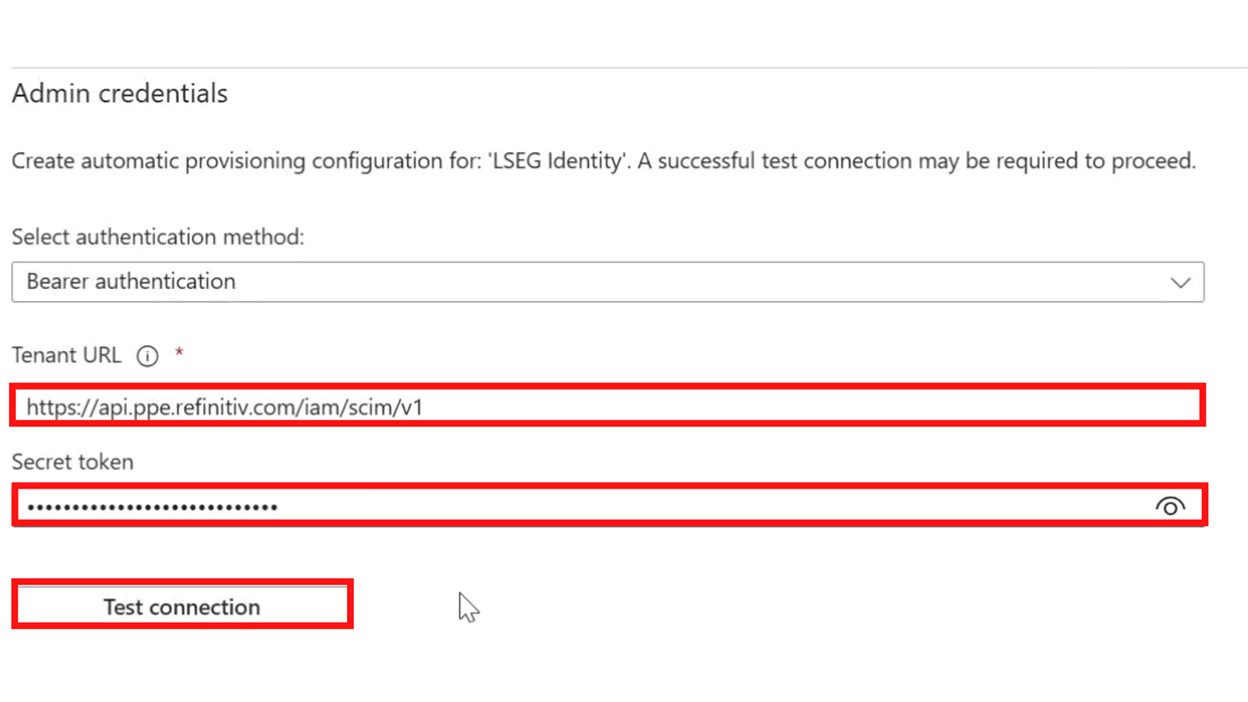
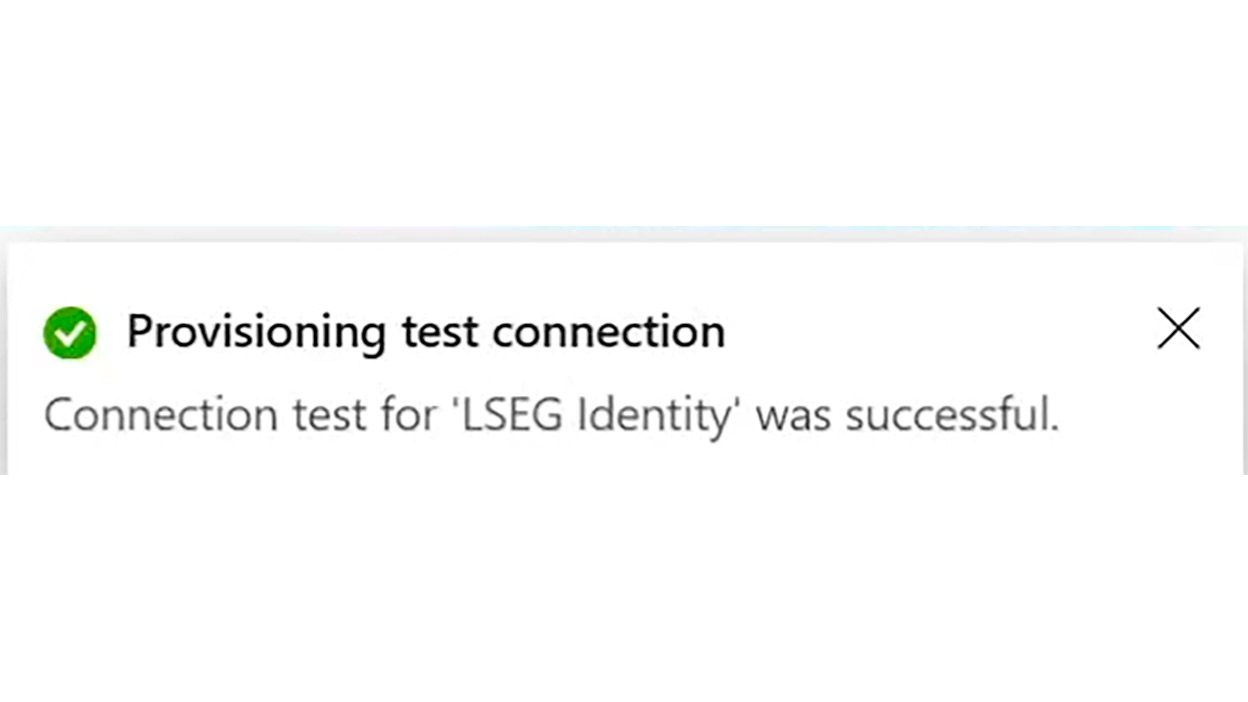
7. After a green checkmark confirming success, select Create.
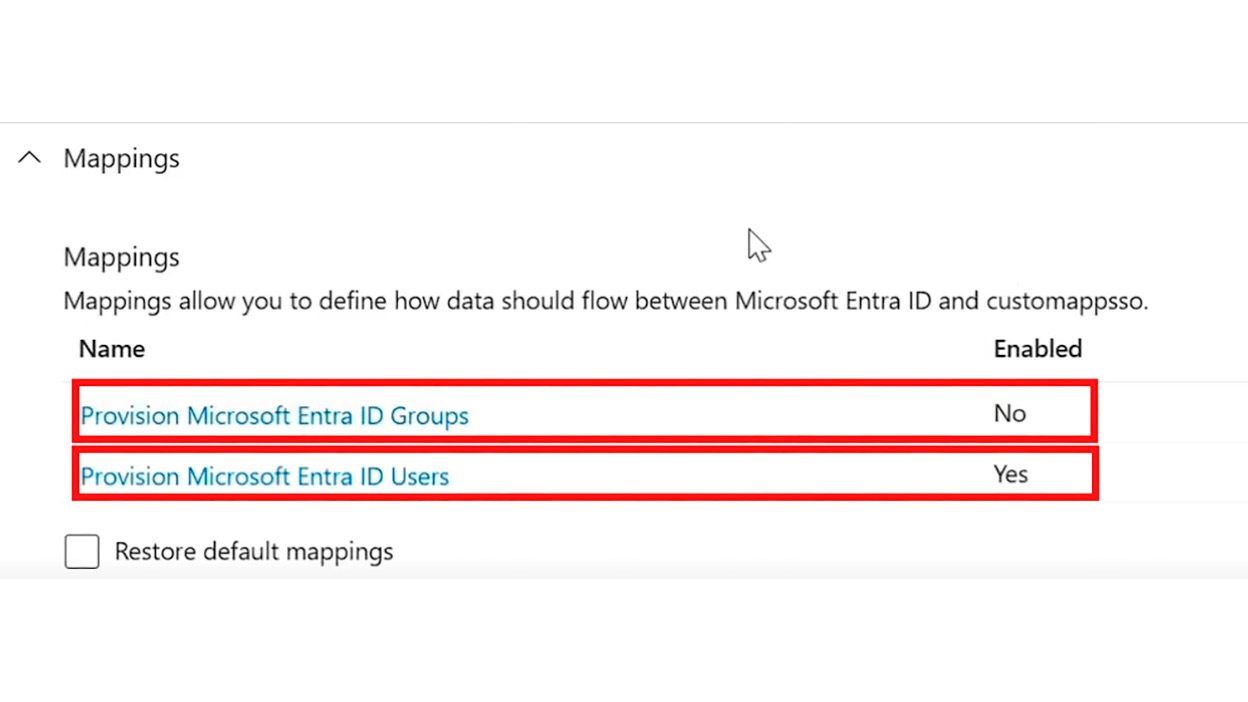
8. Under Mappings, confirm group provisioning is disabled, and user provisioning is enabled.
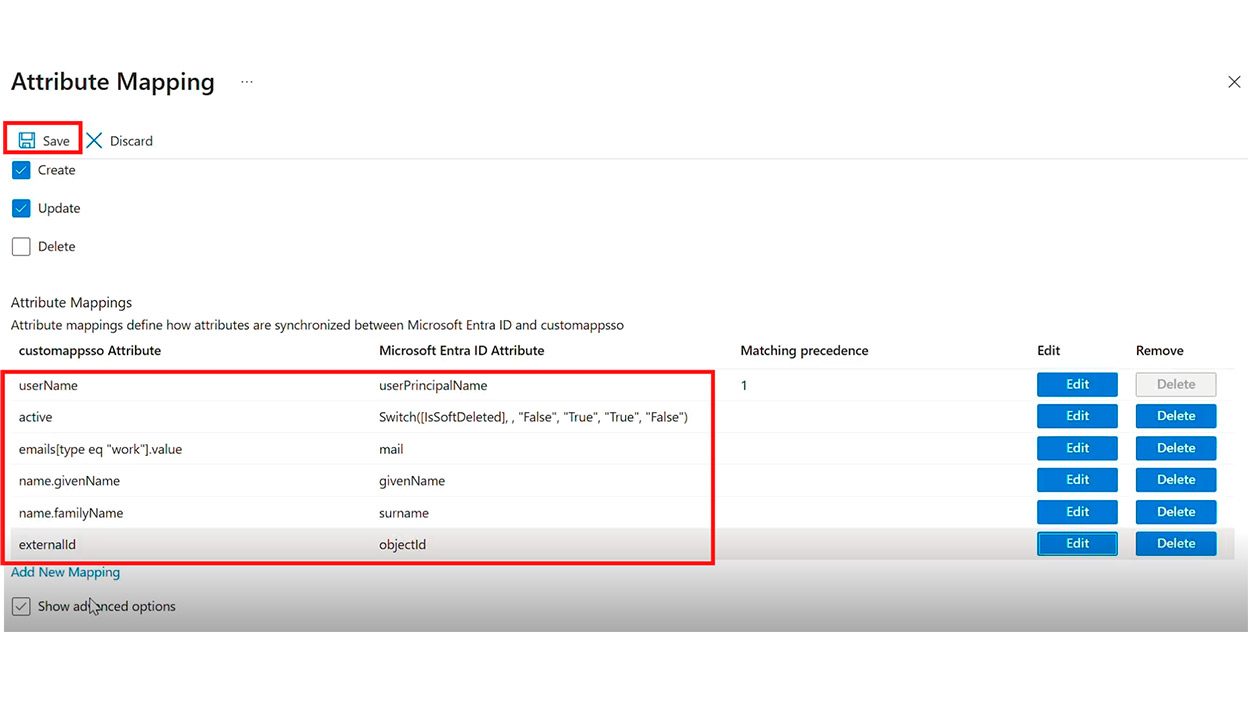
9. Complete attribute mapping with the required fields, then click Save.
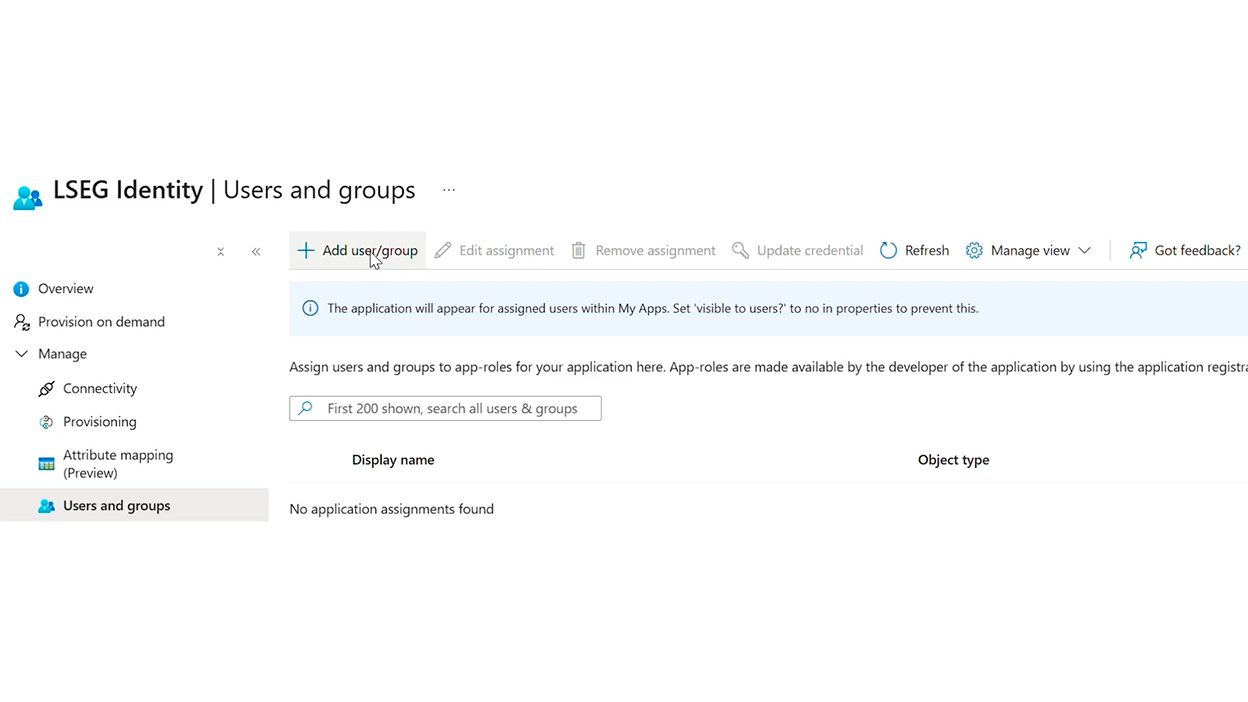
10. Under Users and groups, click Add user/group to add and assign the users you want provisioned.
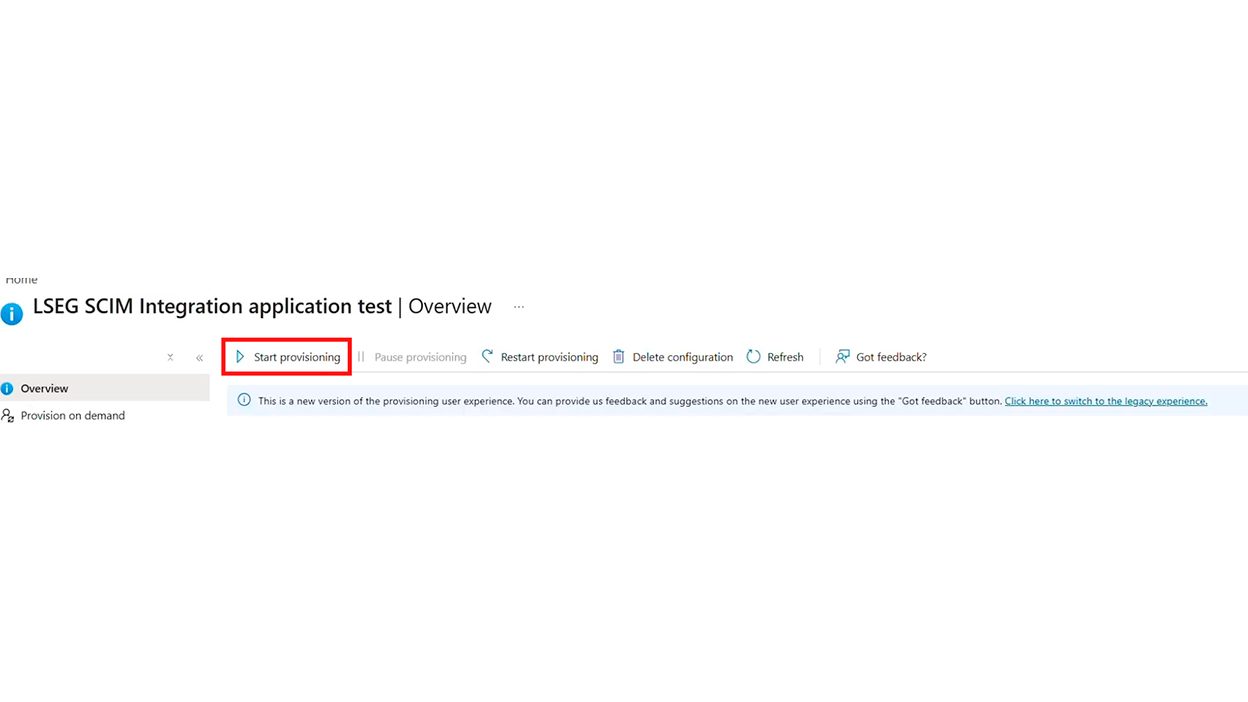
11. After assigning your selected users, go to Overview and select Start Provisioning to provision all assigned users.
12. In LSEG Workspace, confirm the tenant configuration was created successfully.
Once complete, users in your provisioning scope are automatically provisioned into LSEG Workspace and can sign in with their corporate credentials.
Support
-
Further help
If you have any questions or issues, please contact LSEG Support -
Connect LSEG Workspace to Microsoft Entra for web users of LSEG WorkspaceFor web users of LSEG Workspace
-
Upgrading to LSEG Workspace with Microsoft EntraLearn how to link your organization's Microsoft Entra account with LSEG Workspace, enable secure single sign-on (SSO), and upgrade to the latest Workspace experience.
-
For detailed configuration stepsLSEG Workspace Entra Administrator Guide


Managing users going forward
After provisioning is enabled, you can manage users directly from Microsoft Entra by:
- Adding users to the provisioning scope
- Updating user information
- Removing users when they leave the organisation
- Monitoring provisioning status and synchronisation results
Provisioning activity can be reviewed within Microsoft Entra to confirm successful user creation and identify any provisioning issues.
Further help
If you have any further questions or issues, contact your Implementation Relationship Manager (IRM), LSEG Account Manager or LSEG Support.
For more information about consent granting, follow Microsoft’s guidelines Microsoft’s guidelines.
